Organizing a 10-Inch Wide Kitchen Cabinet for Baking Sheets
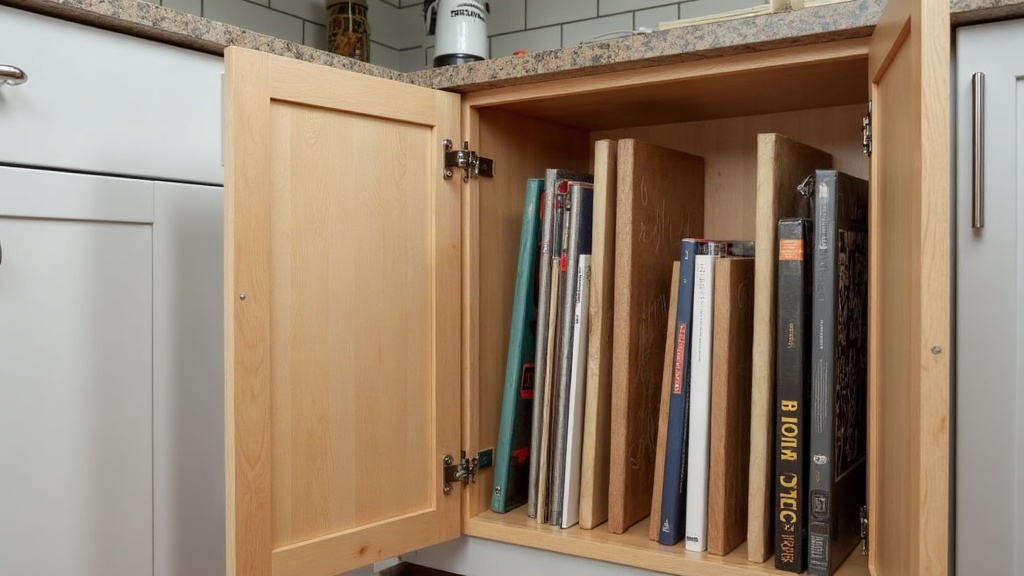
That skinny 10-inch cabinet slot next to your oven looks like dead space at first. Too narrow for a shelf, too weird for anything else, right? Actually, it’s one of the smartest spots in your whole kitchen once you know what to put in it. Baking sheets, cutting boards, and trays are flat and thin, which is exactly the shape that fits a slim vertical gap. Here’s how to measure it, pick the right dividers, and set everything up so nothing tips over or jams the door.
Why a 10-Inch Cabinet Is Perfect for Baking Sheets
Narrow cabinets get ignored because regular shelves and stacking just don’t work in them. But think about what you’re actually storing: sheet pans, muffin tins, cutting boards. They’re all flat. Instead of piling them horizontally and digging through a wobbly stack every time you need the one on the bottom, stand them on their edges and slide each one out like a book off a shelf. Way less frustration, and honestly, way less risk of scratching your nonstick pans against each other.
Step 1: Measure Before You Buy Anything
Don’t skip this. Before you order a single organizer, grab a tape measure and get real numbers:
- Interior width: Measure at the narrowest point, since hinges or trim can quietly eat up an inch or more.
- Interior depth: Most baking sheets run 13 to 18 inches long, so make sure the cabinet can actually fit your biggest pan front to back.
- Interior height: Look for a fixed shelf splitting the cabinet. If there’s one halfway up, that limits how tall your standing items can be.
Write these numbers down somewhere you won’t lose them. A lot of people buy “adjustable” dividers online, only to find out they still don’t compress small enough for a 10-inch space.
Step 2: Empty and Clean the Cabinet
Pull everything out first, usually a strange grab-bag of trays, cutting boards, and mismatched cookie sheets. While it’s empty, wipe the interior down and check for:
- Grease buildup on the wall closest to the stove
- Warped or peeling shelf liner
- Loose screws on the hinges (narrow cabinet doors tend to take more wear from constant opening and closing)
Step 3: Choose the Right Divider System
For a cabinet this narrow, you’re really choosing between three setups:
- Adjustable tension-rod dividers: Spring-loaded rods that wedge between the cabinet floor and the shelf above. Cheap, no drilling required, and you can install them in about five minutes.
- Peg-board style inserts: A base with movable pegs so you can create custom-width slots. Handy if you’re mixing thick cutting boards with thin cookie sheets in the same cabinet.
- Slide-out wire racks: Pull-out trays with built-in vertical slots. Pricier, but by far the easiest to access, especially if the cabinet runs deep.
For most 10-inch cabinets, two or three tension rods spaced 3 to 4 inches apart does the job just fine, no tools needed.
Step 4: Arrange by Frequency of Use
Once the dividers are set, think about how you actually cook, not just how things look.
- Front slot: Whatever you grab most, usually your everyday half sheet pan.
- Middle slots: Cutting boards, cooling racks.
- Back slot: The stuff you use occasionally, bundt pans, jelly roll pans, holiday cookie sheets.
If this cabinet sits right next to the oven, keep the heat-safe sheet pans up front. You’ll want quick grab-and-bake access when the oven timer’s already counting down.
Step 5: Label and Maintain the System
A small label on each divider, “sheet pans,” “boards,” “cooling racks,” keeps things consistent, especially if more than one person cooks in your kitchen. Every couple of months, do a quick check:
- Wipe down the dividers to clear off flour dust and grease film
- Re-tighten tension rods if they’ve loosened from being slid in and out repeatedly
- Check whether new pans still fit properly, since cheaper dividers can bow or warp over time
Common Mistakes to Avoid
- Overpacking: Cramming in every pan you own defeats the whole point. Leave a little wiggle room so things slide freely instead of scraping.
- Ignoring depth: A pan that’s too long will jut past the dividers and stop the door from closing all the way.
- Skipping measurements: This is the number one reason people end up returning organizers. Measure twice, order once.
Conclusion
That awkward 10-inch cabinet doesn’t have to sit there wasting space forever. Measure it properly, pick dividers that actually fit, and organize by how often you reach for each item. Do that, and you’ve turned a dead zone into a dedicated, efficient home for your baking sheets, cutting boards, and trays, no more digging through a messy stack every time you want to bake something.